
前言
KubeSphere 愿景是打造一个以 Kubernetes 为内核的云原生分布式操作系统,它的架构可以非常方便地使第三方应用与云原生生态组件进行即插即用(plug-and-play)的集成,支持云原生应用在多云与多集群的统一分发和运维管理。
正文
环境准备
| 名称 | 版本 | 配置 | 链接 |
|---|---|---|---|
| 宿主操作系统 | Windows 11 专业版 | 8c32g | —— |
| 虚拟机 | VMware-workstation-full-16.2.3 | 8c16g | 下载 |
| 虚拟机操作系统 | CentOS-7-x86_64-Minimal-2009.iso | —— | 下载 |
| Kubernetes | 1.21.5 | —— | —— |
| KubeSphere | 3.2.1 | —— | —— |
| docker | 20.10.8 | —— | —— |
配置虚拟机
省略安装VMware到进入centos命令行部分,下面说说开机后需要配置的东西(使用root账户进入系统)
网络配置
虚拟机网络设置选择
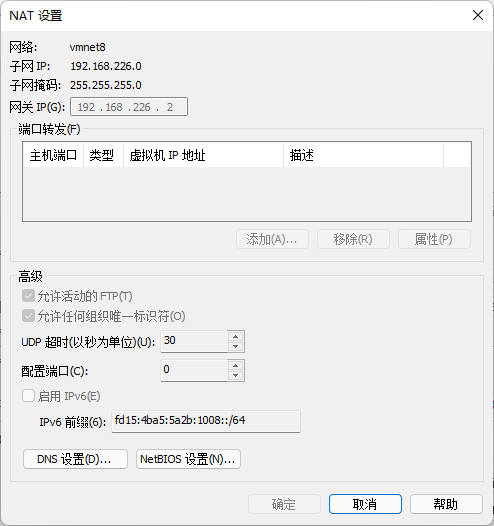
NAT模式,进入 VMware的编辑->虚拟网络编辑器,选择VMnet8并点击NAT设置查看网络信息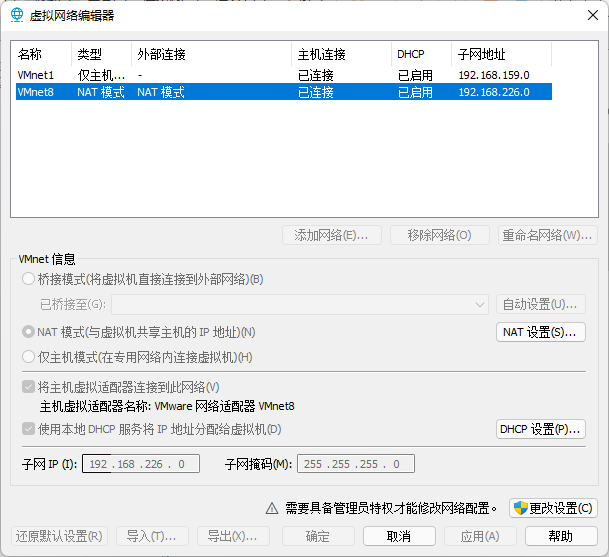
修改centos的网络信息
shellvi /etc/sysconfig/network-scripts/ifcfg-ens33 TYPE=Ethernet PROXY_METHOD=none BROWSER_ONLY=no BOOTPROTO=static # 设置为静态 DEFROUTE=yes IPV4_FAILURE_FATAL=no IPV6INIT=yes IPV6_AUTOCONF=yes IPV6_DEFROUTE=yes IPV6_FAILURE_FATAL=no IPV6_ADDR_GEN_MODE=stable-privacy NAME=ens33 UUID=f52a7ceb-fb4f-407e-b1fa-62489e10b851 DEVICE=ens33 # 以下需要添加 ONBOOT=yes IPADDR=192.168.226.3 # 最后的数字不被占用即可 PREFIX=24 GATEWAY=192.168.226.2 # 上图的网关ip DNS1=8.8.8.8 DNS2=114.114.114.114 NETMASK=255.255.255.0 # 上图的子网掩码shell# 重启网络服务 systemctl restart network.service # 此时可通过ping检查网络是否连通修改hostname(可选),这一步的目的是区分集群的不同节点
vi /etc/hostname

master
在后面的安装过程中,安装程序会自动分配节点名字,如下:
shellvi /etc/hosts # kubekey hosts BEGIN 192.168.226.4 node1.cluster.local node1 192.168.226.5 node2.cluster.local node2 192.168.226.3 master.cluster.local master 192.168.226.3 lb.kubesphere.local # kubekey hosts END确保虚拟机端口可用(本教程未作额外修改)
| 服务 | 协议 | 行为 | 起始端口 | 结束端口 | 备注 |
|---|---|---|---|---|---|
| ssh | TCP | allow | 22 | ||
| etcd | TCP | allow | 2379 | 2380 | |
| apiserver | TCP | allow | 6443 | ||
| calico | TCP | allow | 9099 | 9100 | |
| bgp | TCP | allow | 179 | ||
| nodeport | TCP | allow | 30000 | 32767 | |
| master | TCP | allow | 10250 | 10258 | |
| dns | TCP | allow | 53 | ||
| dns | UDP | allow | 53 | ||
| local-registry | TCP | allow | 5000 | 离线环境需要 | |
| local-apt | TCP | allow | 5080 | 离线环境需要 | |
| rpcbind | TCP | allow | 111 | 使用 NFS 时需要 | |
| ipip | IPENCAP / IPIP | allow | Calico 需要使用 IPIP 协议 | ||
| metrics-server | TCP | allow | 8443 |
请参照官网的 端口要求 和 在 Linux 上以 All-in-One 模式安装 KubeSphere
安装软件依赖
| 依赖项 | Kubernetes 版本 ≥ 1.18 | Kubernetes 版本 < 1.18 |
|---|---|---|
socat | 必须 | 可选但建议 |
conntrack | 必须 | 可选但建议 |
ebtables | 可选但建议 | 可选但建议(此版本自带) |
ipset | 可选但建议 | 可选但建议(此版本自带) |
yum install socat
yum install conntrack
其他配置
设置时区
shell# 设置时区为Asia/Shanghai timedatectl set-timezone Asia/Shanghai时间同步工具
shellyum install chrony # 查看时间同步服务器列表 chronyc -n sources -v 210 Number of sources = 4 .-- Source mode '^' = server, '=' = peer, '#' = local clock. / .- Source state '*' = current synced, '+' = combined , '-' = not combined, | / '?' = unreachable, 'x' = time may be in error, '~' = time too variable. || .- xxxx [ yyyy ] +/- zzzz || Reachability register (octal) -. | xxxx = adjusted offset, || Log2(Polling interval) --. | | yyyy = measured offset, || \ | | zzzz = estimated error. || | | \ MS Name/IP address Stratum Poll Reach LastRx Last sample =============================================================================== ^- 84.16.73.33 1 9 274 32m +65ms[ +66ms] +/- 175ms ^- 193.182.111.14 2 10 141 779 +4483us[+5181us] +/- 181ms ^+ 195.171.43.10 1 10 377 266 +127us[ +127us] +/- 113ms ^* 124.108.20.1 2 9 175 489 +768us[+1505us] +/- 113ms You have new mail. # 查看本机时间的同步状态 chronyc tracking Reference ID : 7C6C1401 (undefined.hostname.localhost) Stratum : 3 Ref time (UTC) : Fri Apr 01 14:02:38 2022 System time : 0.000346914 seconds slow of NTP time Last offset : -0.000754376 seconds RMS offset : 0.000782629 seconds Frequency : 12.921 ppm fast Residual freq : -0.024 ppm Skew : 1.115 ppm Root delay : 0.208009407 seconds Root dispersion : 0.007029841 seconds Update interval : 521.8 seconds Leap status : Normal禁用防火墙
shellsystemctl stop firewalld systemctl disable firewalld禁用swap分区
shell# 删除 swap 区所有内容 swapoff -a # 注释 swap 行 vi /etc/fstab # 重启系统,测试 reboot free -h关闭SElinux
shell# 永久 sed -i 's/enforcing/disabled/' /etc/selinux/config # 临时 setenforce 0
配置好虚拟机后,可通过VMware的克隆功能,生成另外两个节点(注意修改hostname和IP)
安装KubeSphere
集群结构
| Node IP | Hostname | Role |
|---|---|---|
| 192.168.226.3 | master | master、etcd |
| 192.168.226.4 | node1 | node |
| 192.168.226.5 | node2 | node |
使用kubekey安装
以下命令在master执行
获取KubeKey
shell# 如果访问Github/Googleleapis受限 export KKZONE=cn # 也可直接执行以下命令 curl -sfL https://get-kk.kubesphere.io | VERSION=v2.0.0 sh -在您下载 KubeKey 后,如果您将其传至新的机器,且访问 Googleapis 同样受限,在您执行以下步骤之前请务必再次执行
export KKZONE=cn命令为
kk添加可执行权限shellchmod +x kk由于是集群安装,需要生成配置文件
shell# 执行命令生成config-sample.yaml文件 ./kk create config --with-kubernetes v1.21.5 --with-kubesphere v3.2.1 # 编辑config-sample.yaml apiVersion: kubekey.kubesphere.io/v1alpha2 kind: Cluster metadata: name: sample spec: hosts: - {name: master, address: 192.168.226.3, internalAddress: 192.168.226.3, user: root, password: "***"} - {name: node1, address: 192.168.226.4, internalAddress: 192.168.226.4, user: root, password: "***"} - {name: node2, address: 192.168.226.5, internalAddress: 192.168.226.5, user: root, password: "***"} roleGroups: etcd: - master control-plane: - master worker: - node1 - node2 controlPlaneEndpoint: ## Internal loadbalancer for apiservers # internalLoadbalancer: haproxy domain: lb.kubesphere.local address: "" port: 6443 kubernetes: version: v1.21.5 clusterName: cluster.local network: plugin: calico kubePodsCIDR: 10.233.64.0/18 kubeServiceCIDR: 10.233.0.0/18 ## multus support. https://github.com/k8snetworkplumbingwg/multus-cni multusCNI: enabled: false registry: plainHTTP: true privateRegistry: "" namespaceOverride: "" registryMirrors: [] insecureRegistries: [] addons: [] --- apiVersion: installer.kubesphere.io/v1alpha1 kind: ClusterConfiguration metadata: name: ks-installer namespace: kubesphere-system labels: version: v3.2.1 spec: persistence: storageClass: "" authentication: jwtSecret: "" local_registry: "" namespace_override: "" # dev_tag: "" etcd: monitoring: true endpointIps: localhost port: 2379 tlsEnable: true common: core: console: enableMultiLogin: true port: 30880 type: NodePort # apiserver: # resources: {} # controllerManager: # resources: {} redis: enabled: false volumeSize: 2Gi openldap: enabled: false volumeSize: 2Gi minio: volumeSize: 20Gi monitoring: # type: external endpoint: http://prometheus-operated.kubesphere-monitoring-system.svc:9090 GPUMonitoring: enabled: false gpu: kinds: - resourceName: "nvidia.com/gpu" resourceType: "GPU" default: true es: # master: # volumeSize: 4Gi # replicas: 1 # resources: {} # data: # volumeSize: 20Gi # replicas: 1 # resources: {} logMaxAge: 7 elkPrefix: logstash basicAuth: enabled: false username: "" password: "" externalElasticsearchHost: "" externalElasticsearchPort: "" alerting: enabled: false # thanosruler: # replicas: 1 # resources: {} auditing: enabled: false # operator: # resources: {} # webhook: # resources: {} devops: enabled: false jenkinsMemoryLim: 2Gi jenkinsMemoryReq: 1500Mi jenkinsVolumeSize: 8Gi jenkinsJavaOpts_Xms: 512m jenkinsJavaOpts_Xmx: 512m jenkinsJavaOpts_MaxRAM: 2g events: enabled: false # operator: # resources: {} # exporter: # resources: {} # ruler: # enabled: true # replicas: 2 # resources: {} logging: enabled: false containerruntime: docker logsidecar: enabled: true replicas: 2 # resources: {} metrics_server: enabled: false monitoring: storageClass: "" # kube_rbac_proxy: # resources: {} # kube_state_metrics: # resources: {} # prometheus: # replicas: 1 # volumeSize: 20Gi # resources: {} # operator: # resources: {} # adapter: # resources: {} # node_exporter: # resources: {} # alertmanager: # replicas: 1 # resources: {} # notification_manager: # resources: {} # operator: # resources: {} # proxy: # resources: {} gpu: nvidia_dcgm_exporter: enabled: false # resources: {} multicluster: clusterRole: none network: networkpolicy: enabled: false ippool: type: none topology: type: none openpitrix: store: enabled: true servicemesh: enabled: false kubeedge: enabled: false cloudCore: nodeSelector: {"node-role.kubernetes.io/worker": ""} tolerations: [] cloudhubPort: "10000" cloudhubQuicPort: "10001" cloudhubHttpsPort: "10002" cloudstreamPort: "10003" tunnelPort: "10004" cloudHub: advertiseAddress: - "" nodeLimit: "100" service: cloudhubNodePort: "30000" cloudhubQuicNodePort: "30001" cloudhubHttpsNodePort: "30002" cloudstreamNodePort: "30003" tunnelNodePort: "30004" edgeWatcher: nodeSelector: {"node-role.kubernetes.io/worker": ""} tolerations: [] edgeWatcherAgent: nodeSelector: {"node-role.kubernetes.io/worker": ""} tolerations: []详情参考 在 VMware vSphere 安装 KubeSphere 中的配置
安装集群
shell./kk create cluster -f config-sample.yaml这一步可能会出现docker镜像无法拉取的情况,可参考以下方式:
- 使用
docker login命令登录docker hub - 运行
export KKZONE=cn命令
- 使用
验证安装
shellkubectl logs -n kubesphere-system $(kubectl get pod -n kubesphere-system -l app=ks-install -o jsonpath='{.items[0].metadata.name}') -f # 顺利的话会在末尾打印 ··· Collecting installation results ... ##################################################### ### Welcome to KubeSphere! ### ##################################################### Console: http://192.168.226.3:30880 Account: admin Password: P@88w0rd NOTES: 1. After you log into the console, please check the monitoring status of service components in "Cluster Management". If any service is not ready, please wait patiently until all components are up and running. 2. Please change the default password after login. ##################################################### https://kubesphere.io 2022-04-01 20:33:19 #####################################################浏览器输入
http://192.168.226.3:30880就可以用啦~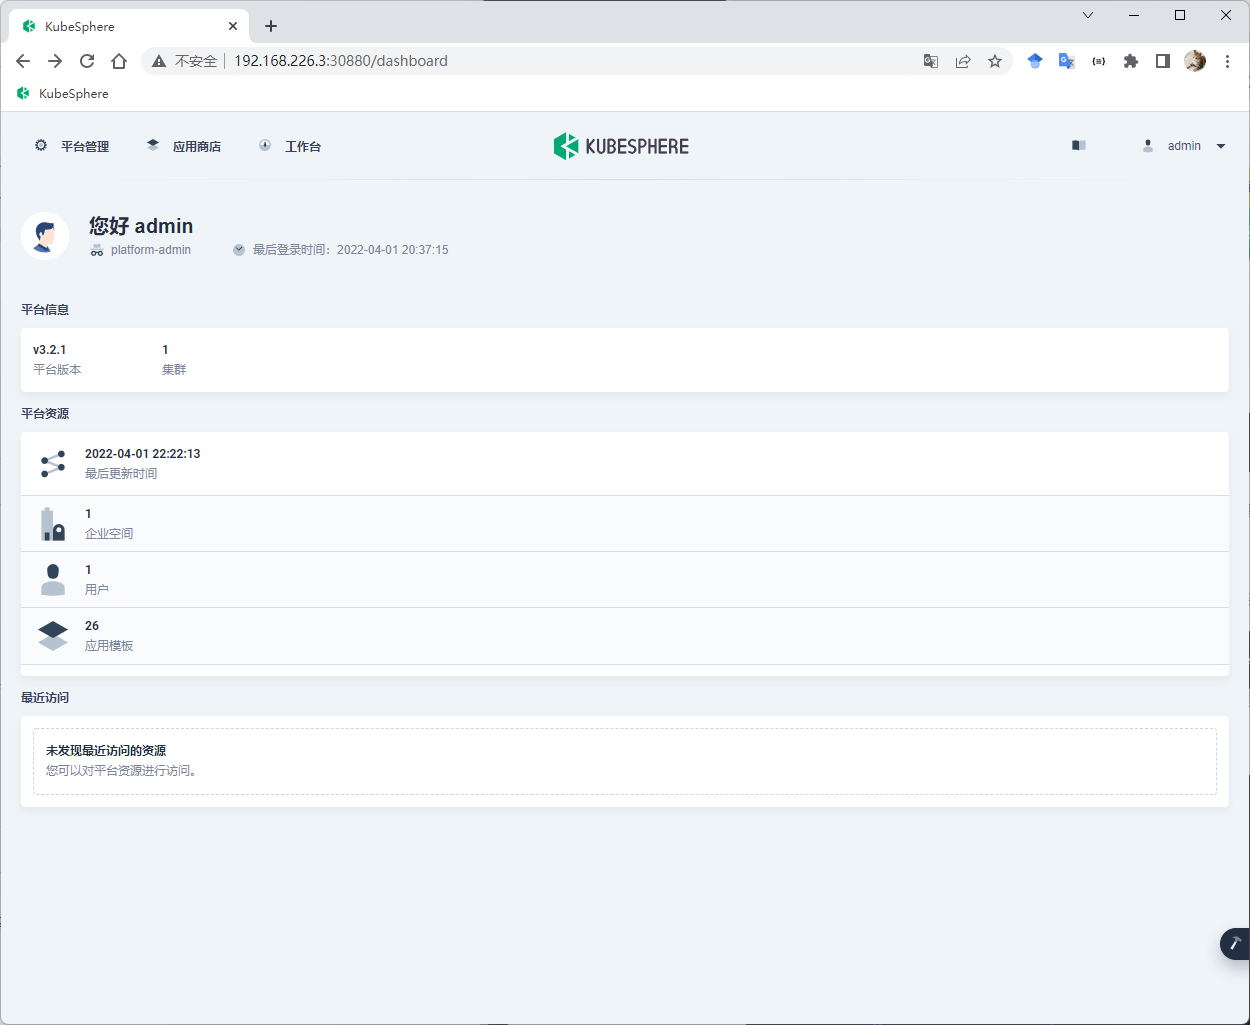
最后
如果有什么不懂,也可以观看官方视频教程👉【3.0最新教程】多节点安装 KubeSphere 开源容器平台与 Kubernetes 集群
好了,快快部署属于你自己的DevOps系统吧~